
Nail Art Designs for Beginners! In the latest nail artwork tutorial, I’ll be displaying you the way to DIY 30 distinct and new nail artwork designs the usage of the nail polish you’ve got at home! This last manual is ideal for novices to nail artwork or the ones of you who simply do not have a variety of time for your hands. Please permit me to realize which one in every nail layout is your favorite. I wish you revel in all of those new and smooth nail artwork designs on this video compilation. Thanks for looking at my video! Don’t neglect to like, remark, and subscribe! 😉
#NailArt #Nails#nails #nailart #diy #beauty #beautyhacks
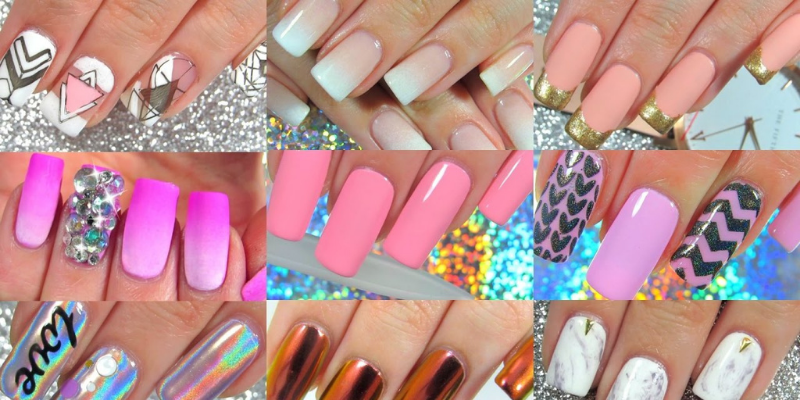
Simple Nail Art Designs For Beginners And Nail Art Enthusiasts
1. White And Orange Flames Nail Art

Everything approximately this nail artwork layout is so sparkling and youthful. The color aggregate is great, and it is able to be pulled off as the proper summertime season nail appearance. You also can use a distinct set of nail hues if you’re aiming for a distinct appearance.
What You Will Need
- A white nail polish
- Orange nail polish
- Yellow nail polish
- Black nail polish
- Nail artwork strips
Step By Step Tutoria
- Apply coats of white nail polish for the bottom.
- Place the strips diagonally throughout every different and practice a coat of yellow nail polish.
- Any other strip vertically on the middle and practice orange nail polish on one side.
- Place the strips as proven withinside the photo and practice black at the bottom of your nail.
- Apply a coat of clean polish to finish the appearance.
2. Purple-Pink Floral Nail Art

Don’t those nails appearance quite as hell? The purple and white aggregate is pleasant and is essentially like you’ve got spring for your fingernails. It’s an easy but elegant layout and may be recreated in only a few steps. You can put on it to liven up the stupid days or maybe on a sunny summertime season day.
What You Will Need
- A white nail polish
- Pink nail polish
- Purple nail polish
- A skinny nail artwork brush or a nail artwork pen
Step By Step Tutorial
- Start through making use of coats of white nail polish in your base.
- Using a skinny brush, create the plant life with a purple nail polish.
- Use the pink nail polish to feature a few oomph to the purple plant life.
- Finish with a pinnacle coat.
- You can select to recreate this appearance otherwise as nicely through growing plant life at the entire nail in place of simply one side. You also can use different shiny hues over your white base.
3. Colour Splash Nail Art


This is through a long way my favored nail artwork layout. You are the usage of your nails as a clean canvas and splashing a few hues round for that cool effect. Isn’t it in order that artsy?
What You Will Need
- White nail polish
- An angled nail artwork brush
- Blue nail polish
- Purple nail polish
- Pink nail polish
- Note: You can use any hues of your preference for this appearance. It will nevertheless appearance simply as cool.
Step By Step Tutorial
- Apply coats of white nail polish for a terrific base.
- Once it dries, dip the comb in blue nail polish and the usage of your thumb, splash the colour over in your nails.
- Follow this procedure for every colour till you obtain the appearance which you want.
- Apply a pinnacle coat to set.
- Your nails are your very very own present day artwork masterpiece now!
4. Colourful Clouds Nail Art

There’s not anything to now no longer love approximately this layout. It’s colorful, it’s smooth, it’s shiny, and it’s so rattling adorable. We’re gambling with simply the hoop fingernail, and the others are left with a minimum aqua green-blue coat of nail polish. This layout is ideal for the spring and summertime seasons.
What You Will Need
- An aqua green-blue nail polish
- Pink nail polish
- Light blue nail polish
- A brush
Step By Step Tutorial
- Paint all of your nails with the green-blue nail polish besides in your ring fingernail.
- Use purple nail polish in your ring fingernail.
- Use a broom to create the clouds. Start with mild blue nail polish and make the vertical traces as proven withinside the picture.
- Once it dries, use the green-blue nail polish to create greater clouds on pinnacle of the mild blue surface.
- Apply a coat of clean polish on pinnacle.
5.Leopard Print Nail Art Design

This elegant nail artwork is simple to recreate with simply a piece of will and patience. Aren’t the give up consequences fabulous? The more youthful crowd will love this animal sample and it seems so formidable and trendy.
What You Will Need
- A nude nail polish
- Light brown-beige nail polish
- Black nail polish
- Nail artwork brush
Step By Step Tutorial
- For your base, practice coats of the nude nail polish.
- Using a broom, create choppy spots with the brown-beige nail polish.
- Once it dries, use the black nail polish to define the spots, leaving gaps withinside the middle.
- Top it up with a coat of clean nail polish.
- There you go! You now have the chicest nails in town. I’m certain you may get a ton of compliments for this classic!
If you’re a hard-middle track lover, then that is something for you. It’s a classic.
6.Musical Notes Nail Art

What You Will Need
- Nude nail polish
- Black nail polish
- A skinny brush
- A dotting tool
Step By Step Tutorial
- Paint your nails with the nude nail polish in your base.
- Create 3 skinny horizontal traces at the decrease a part of your nail the usage of a skinny brush.
- Using your dotting tool, create a dot over the traces as visible withinside the photo.
- Now, create the track be aware the usage of the equal brush.
- Top it with a coat of clean polish.